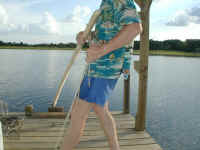
We have decided to use a Yuloh paddle on the Subak. There are a number of reasons for this, including simplicity, facing forward, efficiency, wanting to experiment and probably a certain aspect of wanting to just be bloody minded and difficult. We had seen videos of people moving (even huge)
sampans(apparently up to three knots!) and adaptions (e.g. the
Ve-scull) that are quite quick. So on Saturday we wasted too much time making a Yuloh while the wind blew, then launched the Subak into a windless harbour a few hours later.

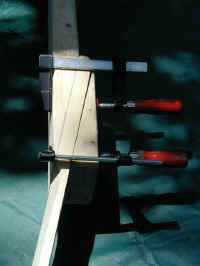
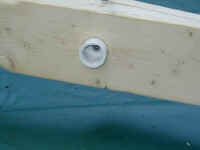
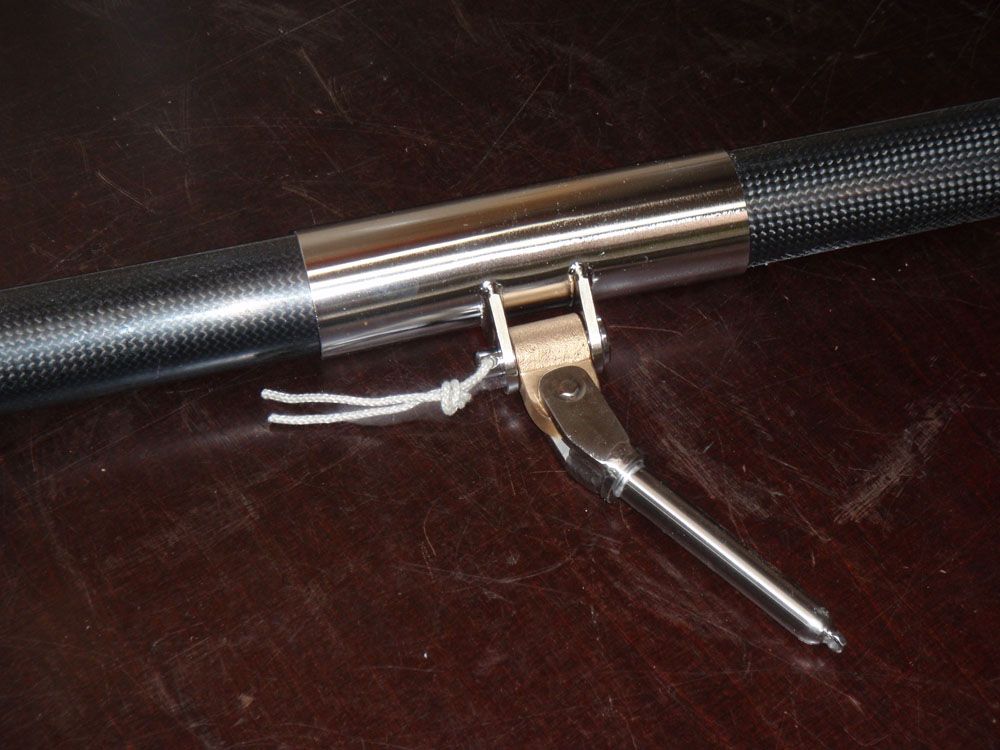
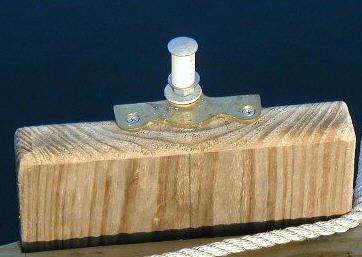
The new Yuloh socket is cut out of a larch verandah plank, then drilled at 45 degrees to match the mounting angle, then a wider hole to allow the yuloh to tilt on each side.
The first experiments with the Yuloh tied onto the transom were surprisingly successful, although quite wrong in many ways. We then built a socket and a pin for the Yuloh and mounted it on the stern. This socket, cut from some hard plywood, was put onto a rounded head screw as the ball joint and was a semi-successful improvement. The plywood had been significantly worked over by the attachment and the work: this seems to be inappropriate.
We then took the design advice from a Yuloh design
text (which we had approximately used previously) and made two major changes: the socket was cut from some
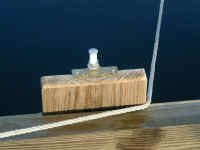
larch planks we had been left with from someone’s new verandah, given a 45 degree basic drilling to support the correct angle of the yuloh, and the mounting on the stern was raised 30cm. The mounting on the stern is now a simple 12mm steel rod with a round head, shaped with a grinding wheel, as recommended
here. The main problem is the danger of bending over and sticking the rod in one’s eye!
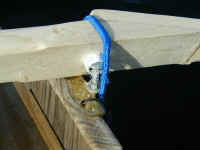
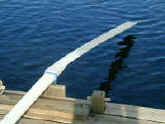
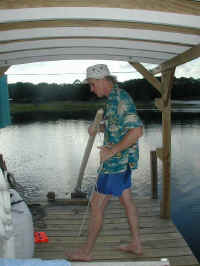
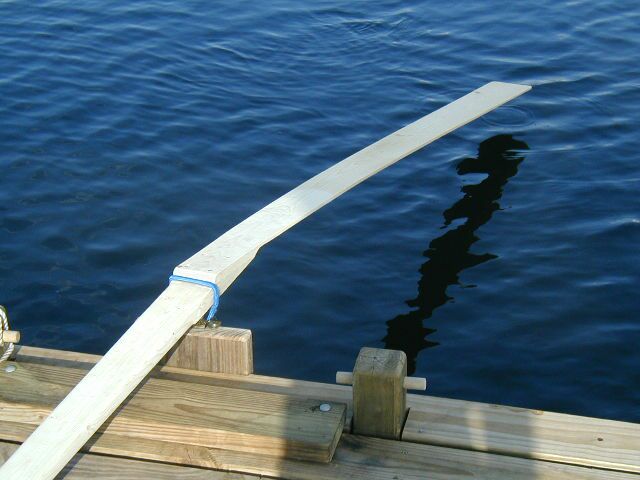
Tests this afternoon with the new socket are positive, but there seems to be a one sided tendency of the movement. This might be that the hole is asymmetric (it was end-shaped by hand) so that the angle of the yuloh on each stroke is different. It might be that I was not standing appropriately centrally, so that the whole movement was off center. The Subak is asymmetric, with the windsurfer dragging off to starboard, so that might have been causing the spin. Tomorrow morning the next experiments and tests will be done. Let’s see what happens.
The $10 Yuloh!
A cheap introduction to "scientific sculling."
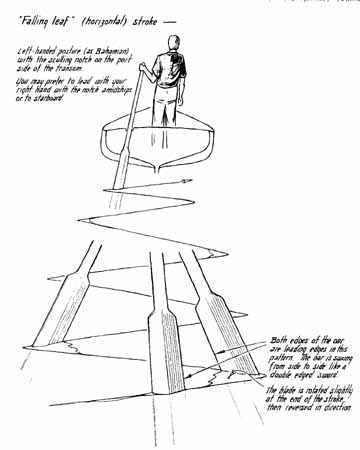
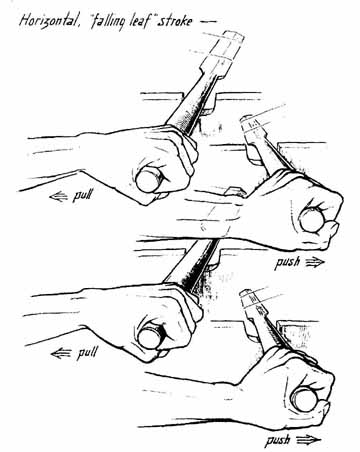
If you're like me, you think of sculling as a kind of inferior form of rowing only to be resorted to when you've lost an oar or are trying to maneuver in close quarters. The way I learned to scull and the amount of time I gave to practicing, it is best left as method of last resort. However "yulohing" has been described as "scientific sculling" and it has remained the oar locomotion of choice in the Orient for hundreds of years and maybe longer. Was it only a matter of long standing tradition that kept the Chinese or Japanese from adopting western rowing techniques once they were exposed to them? I think not. Let me try to explain the Yuloh's advantages.For those of you who have researched outboard motor auxiliaries for sailboats you know that larger props moving at lower RPMs render more torque than smaller props at higher RPMs. This same principle can be applied to oar blades. Being bigger, the Yuloh is not capable of being moved very quickly, however the long Yuloh blade with a surface area many times that of a traditional western rowing oar displaces a lot of water as it moves. Like the western oar, the Yuloh makes use of a fulcrum and a lever, however rather than merely having your muscle and your body weight at the working end of the lever, you have a lanyard attached to the deck or bottom of the boat. This gives great assistance to the rower in counteracting the pressure of the water against the business end of the blade, which translates into forward thrust. Whether from the flex of the Yuloh blade or the snap of the lanyard at the end of the arc of the stroke (see notes below), there is power and forward thrust coming from the yuloh blade all the time it is in motion. Now this bears contemplating. Notice that when rowing there is always a coasting component to the stroke. As the oars are lifted from the water and returned to their power position, energy is being expended that is not directly applied to moving your craft. With the Yuloh this isn't the case. As you are leaning to and froe, all of your movement and body weight and strength is being translated into forward thrust.
Add to the above advantages the ability to propel a craft that might be too wide to row, and the ability to face forward and see where you're going, and you can begin to understand the reasons behind its long lived popularity. |
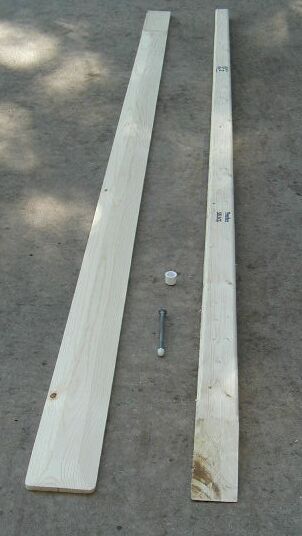
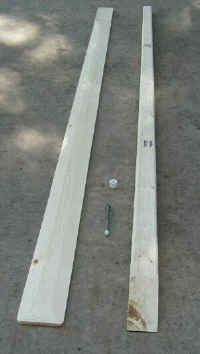 | The materials I started with:
- one spruce 2x4 8 feet long ($2.49)
- one spruce 1x6 8 feet long ($3.99)
- one 3/8" galvanized carriage bolt 6" long + 3 nuts and 2 washers
- one 1/2" PVC pipe cap
- 6 - 1.5" galv. deck screws
- PL Premium glue (could substitute Titebond II)
Added later:
- 1/2" polybutyl tubing - a couple of inches
- 7/8" dowel rod 6" long
|
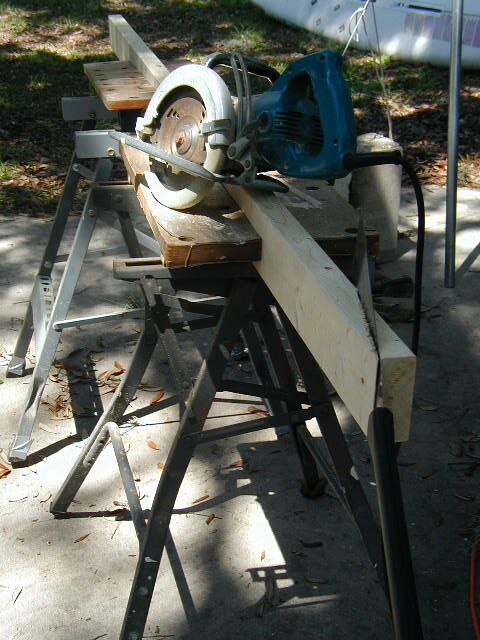
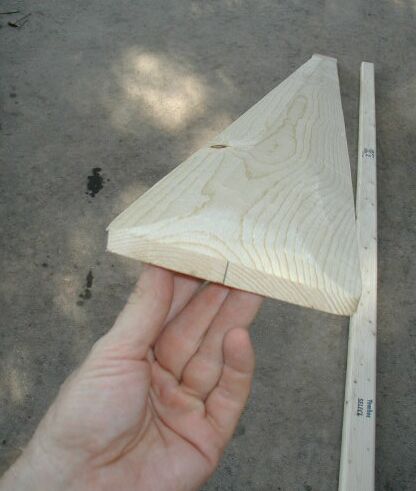
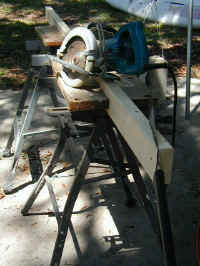 | After examining all the literature I could lay my hands on, (A huge thank you to Craig O'Donnel, who proved to be his usual font of information.) and checking a bevel guage against my shanty dock sketch, I settled on 11 degrees for the angle between the blade and the shaft or handle of the oar. I drew the angle on the 2x4, then began the cut with my circular saw and finished it up with my Japanese pull saw. Save the piece you saw off to help you clamp the joint.After this cut I did the taper cuts on my table saw. The blade tapers from 5.5" at the water end, to 3.5" where it joins the shaft. The shaft tapers from 3.5" where it joins the blade to 1.75" at the end. |
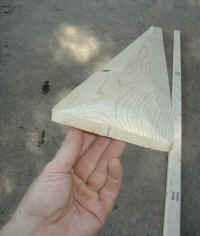 | My research showed the aft side of the blades to be flat while the leading sides were either triangular in cross section or curved to give lift like a mini wing section. I personally question the validity of the "lift" aspect of the Yuloh's thrust, but decided to split the difference and make a three sided leading face.The blade stays 3//4" thick in the middle but tapers to 3/8" thick at the edges. I tilted the table saw blade to 13 degrees and ran the oar blade against the saw fence. Leave it square where the glue joint will be. Since I did this step after cutting the lengthwise taper in the blade, the top face in the photo narrows with the blade while the outer facets maintain their width.
I also rounded all the edges on the shaft with a 3/4" round over bit in my router. |
 | Testing the fit of the blade and shaft. |
 | Apply glue and clamp. The wedge you cut off earlier will give you a parallel clamping surface. Since I was going to use mine before the glue had fully cured I also used four 1 1/2" galvanized deck screws. I used PL Premium glue because I like it so much, but I'm pretty sure Titebond II would work as well. |
 | Here's a look at the wear that resulted from just a few minutes of sculling with the first pin attempt without the poly butyl tubing. It chewed up the cap edges pretty quickly. I counted on the plastic pipe caps to be expendable and easily replaced, but not with every use! |
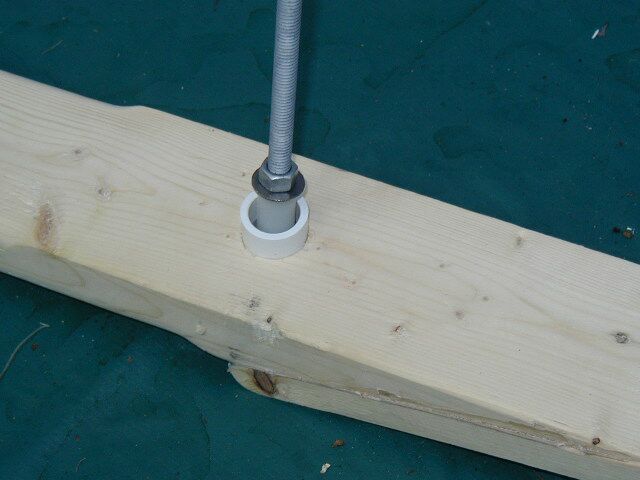
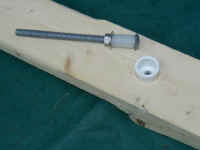 | Here is the pin and cap ready for use. The pin is a 6" by 3/8" carriage bold with a short piece of 1/2" polybutyl tubing held in place with a washer and nut. This both limits wear of the cap edges and limits the side to side travel or tilt of the pin in the cap. That in turn limits the feathering of the yuyloh.The cap is inset in a 1/4" deep hole the diameter of the cap. It's held in place with a galv. deck screw, that is countersunk into the inside of the cap. |
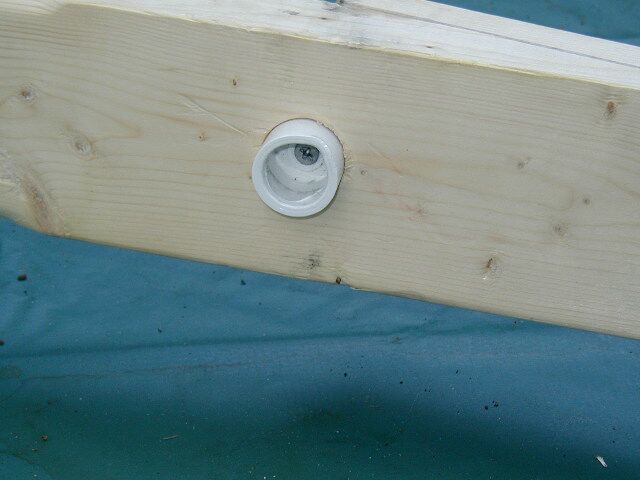
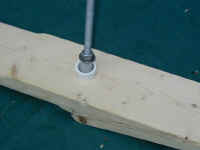 | Here is the pin in place in the cap. |
 | This is the cap after about an hour of sculling, and the wear is negligible. |
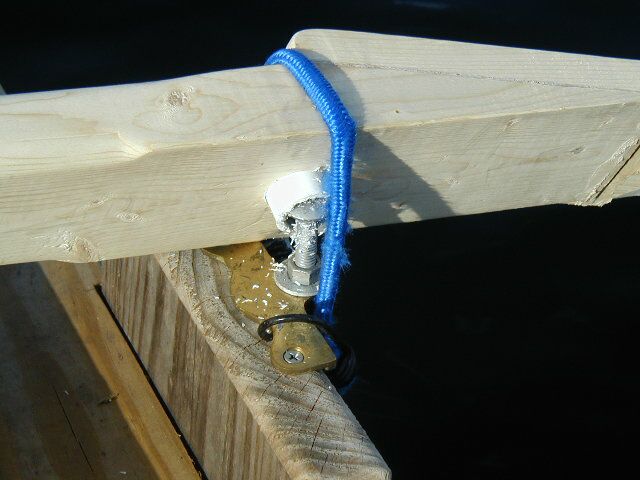
 | My original idea was to drill a hole through one of the boards in my shantydock, and tighten it with nuts and washers top and bottom. Turned out I had a bronze oar lock that was more easily movable for experimentation so I used it on my motor mount.Here is the pin in the oar lock. I've secured it with another washer and two more nuts, the last acting as a lock nut against the first. This places the pin vertical. If I needed more slant to the oar, I'd have to mount the pin at an angle as well. |
 | The oar is amazingly well balanced. The shaft is slightly heavier than the blade so when at rest, the blade comes clear of the water. |
 | Some observations:I'm finding that limiting the amount of feathering is the challenge. The oar is wanting to rock off the pin. If I only hold the lanyard it will over feather. I'm not sure if this is the fault of the pin mount or the angle of the oar offset. I chose 11 degrees while some claimed 8 degrees was the ideal. Though my GPS wasn't working I got the shantydock moving pretty well judging by its wake, even into a light breeze.
Some of the instructions claim a "snap" of the lanyard is necessary at the end of each stroke. I'm not finding this to be true. What happens is the blade flexes during the stroke and when the end of it is reached the blade straightens and the oar rotates into the new feather angle. This is without my assistance. It makes me feel that if the tendency to over feather can be cured adapting the oar to step power should be pretty workable. |
 | A short wooden handle off the top of the shaft, as shown in some of the drawings, might be useful. This would be to counteract the feathering tendency of the blade. Though subtle steering can be done by pulling harder on one side of the stroke than the other, its more dramatic to alter the feather of the blade. For most decisive turning the blade can be "un-feathered" meaning trimmed horizontal so it travels back to the other side without imparting thrust at all. A handle would greatly facilitate that control. |
Return to the Yuoh Resources page.
Feel free to email me, David Beede simplicityboats
Back to Simplicity Boats Home page.
Chain wrapping for additional weight, to prevent jumping off the transom pin. Approximately 1 lb. 12 oz., 4 feet of 3/16" chain. Ankle or wrist weights meant for exercising would probably be easier.
‘Minnow’s’ Yuloh – Part 3 (Yuloh Links)
The epoxy cured overnight, and this morning I sanded the yuloh’s shaft in preparation for varnishing. I also started sanding the blade to give it a better finish. I’ll paint the lower part of the yuloh.
Until I receive a stainless steel pivot pin from the firm that is manufacturing it, I am reluctant to drill into the shaft to form a cavity for the pivot cup. I shall use the pin to shape a cup in an epoxy base – that is my plan. I’ll coat the rounded end of the pin with grease to prevent it from sticking to the epoxy. The reciprocal pieces should fit together perfectly.
I shall have to devise a means of suspending the pin in the epoxy so that no more than half of the ball is submerged in the epoxy. If that were to happen I would not be able to extract the pin from the cured epoxy without cutting into it.
Links
Wooden Boat NZ Sculling
How to Scull a Boat
Bing Yuloh Images
The $10 Yuloh
Single Oar Sculling
Yuloh, Zhujiajiao, China
Stevenson Pocket Cruiser under Yuloh
AD-scull. sculling action,deck view
Easy Go Yuloh – Part One
Easy Go Yuloh - Part Two
Cranks with Planks
Yuloh – Dave’s Wiki
Collars – The Yuloh Sculling Oar
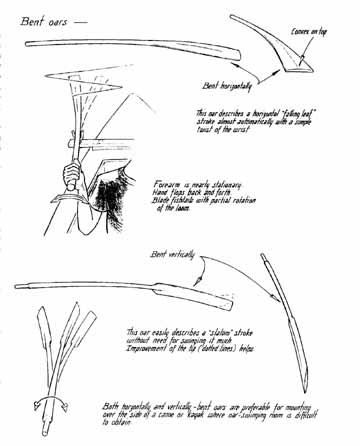
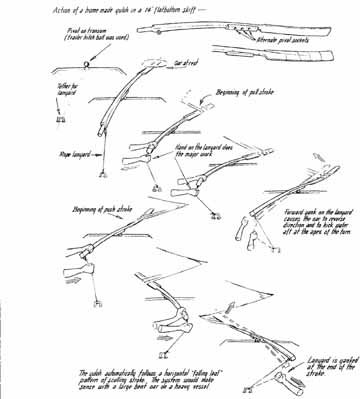
Yuloh Design Cycles
Sailing Auklet – The Yuloh


4 comments:
Sean's blog is a favourite of mine. I am inspired by what he is doing with 'Scout'.
Cheers,
Bill.
Fantastic amount of information on this post on Yuloh's...thanks for compiling all that. I am about to make some mods to my own as we got the shape of the foil on the blade reversed from the way it is supposed to be. It works and I am getting the hang of it, but I suspect I can make it much more efficient if I get that foil corrected.
Minnow is looking outstanding! Keep up the good work!!
S
http://www.youtube.com/watch?v=y-G_StsC3zo
Steve